This tutorial will show my crude but efficient enough way of getting a good end product with simple means.
.......................
A few things before I proceed with the actual tutorial.
I use a Samsung ST600 camera since before christmas. Prior to that I used the same old Olympus 6 megapixel camera for 5 years and could still take good pictures even though it had less than half the amount of pixels that my new camera has, and where I had to manually crank around what options I needed to use.
Most cameras have a "macro"/"extreme closeup" setting, or like my camera "smart auto" that adjusts to the right conditions. If your camera does not have "smart auto focus" then when you take pictures of models - use the "macro"/"extreme closeup" and position the camera roughly 8"/20cm from the miniature to get the right conditions.
As for the background color I used a toned light blue background for a few years, it is only recently that I swapped to a white background. Other people use black backgrounds. It all really depends on how much contrast you want between the miniature and the background. I've come to like using a completely white background more than the toned light blue one because I feel that the miniature looks "sharper". And using white background just requires a regular white piece of paper that you use for your printer while the toned light blue requires you to print out such a background and you will need to replace the background at a certain frequency as it gets worn.
....................
 So this is how I set up, nothing fancy. White paper resting against my camera mini trip-pod, miniature weight holding the white paper in place. The lamp I use is part of a larger lamp. One "main lamp" and a smaller attached "reading lamp" that can be turned and twisted in all possible angles. I use it when I paint as well as when I take pictures. The lamp is 35W 230V.
 I try to direct it so that the globe of light hits the model straight on, trying to minimize the risk of too dark shadows on the model by a more direct from above angle.
Here are 4 unedited pictures taken under the following conditions.
 No lights turned on at all. Just using whatever daylight I get through the window.
 Picture taken with the ceiling lights on mixed with daylight. As you see it looks pretty much identical to the picture above.
 This picture was taken with direct light aimed at the model. But the lamp was too close and the picture got very yellow.
 This picture was taken with direct light aimed at the model, at the right distance, in my case 19"/50cm. However the unedited picture looks very much like the first 2. And you won't see the difference and importance of light until you start to edit all examples.
......................................................
So let's see what results we can get and highlight the importance of good light during the picture taking process. Apart from what you've seen of my "set up" and the description of my camera - I also use AcdSee Pro 2 for my editing. People mostly use some variety of AcdSee or Photoshop. Both have similar features, I just personally think that AcdSee is more casual user friendly and the loading times of the software are minimal. I use AcdSee both for cropping my pictures, editing and sometimes to apply basic effects such as a sepia or "old faded" filter.
Example 1, the result of editing a picture with bad light.
This was our unedited picture. Going into AcdSee editing mode, I go to the little button called "Levels", click that and a new toolbar pops up. There is a button called "Auto", click that and there are 3 options. Depending on the circumstances one of these 3 should instantly fix your picture and make the model look as it did in real life. Most often it is the "Auto adjust color and contrast" option.
 Using that option we get this result. A somewhat better and brighter but still dark and dull looking picture that does not represent the colors or light very well.
Example 2, the result of editing the picture that turned yellow due to having the lamp too close to the model.
This was our unedited picture. It looks like crap, worse than the picture with bad light.Or does it? Auto adjust color and contrast almost salvaged this one. And as you can clearly see the model and picture is much brighter than the picture taken with no lights at all. It is still suffering from that "yellowness" inflicted by the lamp though.


Example 3, the result of editing a picture that was taken with good light.
Unedited original picture to the right. And let's see how it really looks like after some "Auto correct color and contrast" editing.
All the difference in the world. Picture is bright, colors represented correctly, the background is pure white as is should be. Picture does not suffer from any tint of yellow or red.
So as you can see taking pictures with crap light or good light often does not show until some editing has been done. You will pretty much only do this simple auto correction to get the most out of the pictures you've taken.
There are 2 more edit options that don't have to be used as frequently but can be used if you like to fine tune a picture end result that still does not reflect how your miniature looks to a 100%.
 Staying in the "Levels" editing, you see something called "Luminancse. When you auto correct a picture the software adjusts the levels of green, blue and red as well as shadows and highlights. Should your picture still be a bit too red, blue or green - just click the "Luminance option" and gently push the sliders left or right and see how the tone of the picture changes to include more or less of a specific color.
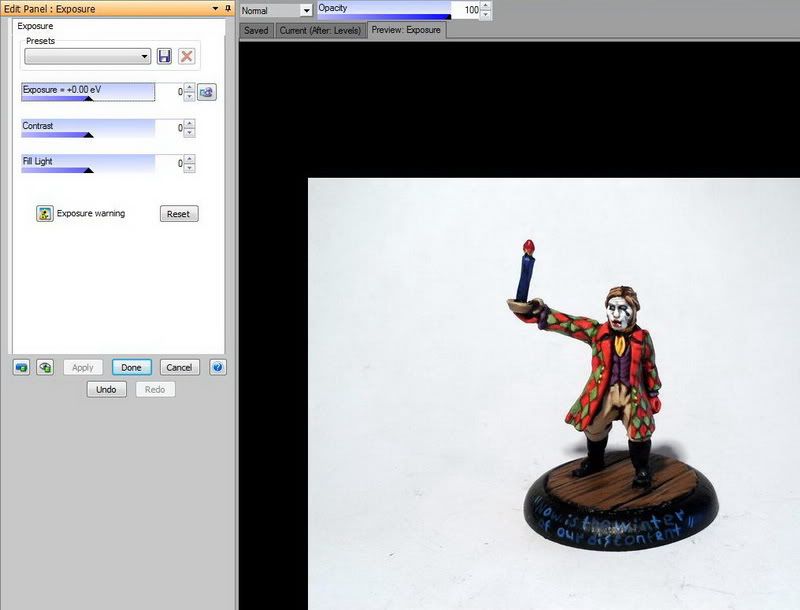 Sometimes you can salvage a bad picture by going to the "Exposure" option and adjust exposure levels and contrast. This will not save a completely botched picture, but could potentially turn a picture from a 8/10 up to a 9-10/10.
 That pretty much concludes my tutorial. Editing pictures this way, takes about 5 seconds per picture. Click on a picture, go into edit mode, click on "Levels", click "Auto correct" adjust, apply, save and move on to the next.
No comments:
Post a Comment